
Visual Schedules at Home: A Practical Setup Guide for Parents of Autistic Children
There is a lot of writing online about why visual schedules exist and not much about where to hang one, what size to cut the cards, or what to do when your child moves every card at once and walks off. This is the practical half — a setup guide, not a therapy protocol, and it doesn't promise to change anything about your child.
Many families find routines easier to follow when they can see them laid out in order, rather than only hear them announced. That's the whole premise: a schedule makes the shape of a day visible. What you do with that is yours to decide, ideally alongside your child's own care team if one is involved.
Where to hang it
Put the board where the routine actually happens, not where it's convenient to store. A morning board belongs in the bedroom or bathroom — not the kitchen, which is where the routine ends. A bedtime board goes wherever the bath-to-bed sequence starts. Room placement beats board quality: a plain board in the right room gets used every day; a beautiful one in the wrong room gets used twice a week.
Start with one routine, not five. Most parents can already name the hardest stretch of the day — mornings, or the walk out the door, or the last twenty minutes before lights out. Start there. A second routine can go up later; adding one too early usually means neither gets used.
Card size and lamination
Two sizes cover almost every use case:
- Standard, 2.00 × 2.40 in — twelve per page, sized for a 2×3 in laminating pouch with room to trim. This is the size wall-mounted routine boards are built around.
- Mini, 1.25 × 1.50 in — thirty per page, small enough for a lanyard, a pencil case, or a strip that travels to school or an appointment.
A few details that save a wasted print run:
- Print at 100% or "Actual size," never "Fit to page." Fit-to-page shrinks the print about 4% — easy to miss, and it stops the cards matching your pouches. Print a scale-test page with a ruler on it first.
- Cardstock, 65–110 lb. Plain paper works for a trial run; cardstock survives daily handling for a year.
- Laminating pouches: 3 mil for cards that get picked up and moved, 5 mil for a board mounted on a wall. Round the corners with scissors afterward — laminated corners are sharp.
- No laminator? Clear packing tape on both sides, trimmed to the card, holds up surprisingly well.
- Sticking: 5/8 in adhesive hook-and-loop dots, soft side on the board, rough side on the card back. Rough-on-the-card means any card works on any board.
- Print two of your ten most-used cards. Cards go missing; a spare set is cheaper than reprinting the whole page.
The First → Then structure
A First → Then board is the smallest version of a visual schedule: two slots, one card each. First shows what has to happen; Then shows what comes after. It's built for a single transition — turning off a screen, getting through a wait, getting out of the bath.
The mechanism is sequencing, not persuasion: "First shoes, then car" states an order rather than a request. Set it up before the harder thing starts — cards out before the screen goes on, not once someone is already asking to turn it off. And once "then" arrives, follow through the same way every time; a "then" that keeps sliding into "five more minutes" teaches that the board is a suggestion.
Introducing the board for the first time
A new object on a wall is still new. Give it a few days before expecting it to run the routine on its own:
- Before day one. Write down the actual steps, in the order you actually do them. A routine that feels like twelve steps often turns out to be six on paper. Print, cut, laminate, add the sticking dots, and place the board in the room where the routine happens.
- Days 1–2, show it, don't use it. Walk your child past the board and name what's on it. Then put it away and run the routine as usual. Two days of the board simply existing removes the novelty at no cost.
- Days 3–4, you move the cards. Point at the card, say its words, do the step, move the card to "all done" yourself. Don't add a second board this week, and don't ask your child to move cards yet.
- Days 5–7, they move the cards. Same routine, but hand over the finished card and let your child place it. That small physical act is often what makes the board start to feel theirs.
- End of week 1, start logging. List the steps you're actually using and log the routine two or three times over the following week. Two weeks of a half-filled sheet tells you more than one perfect week.
- Week 3 onward, add a second routine — only once the first has stopped needing your attention.
One rule runs through every stage: keep the card order fixed. If it genuinely needs to change on a given day, put a "the plan changed" card into that slot before the routine starts, not partway through it.
Choosing which steps belong on a card
- Six steps beats twelve. A board your child can see the end of is a different object from one that runs past what they can hold in mind. A genuinely twelve-step routine can be split into two boards, with a card at the bottom of the first pointing to the second.
- One action per card. "Get ready for school" is a request, not a step. "Put on your shoes" is a step — could someone who has never met your child do exactly what the card says, and stop?
- A step that stalls in the same spot every day is usually hiding a smaller step. If shoes are the recurring problem, it might really be socks, or finding them, or the heel going in right. Split it and see.
- Put an easy step first, not the hardest thing on the board.
- End with something that clearly ends — shoes on, lights out, in the car. "Have a nice day" isn't a step a card can show.
What to do when a step gets skipped
Skipping is information, not a failure to correct. A step that suddenly needs more help than it did last week is usually a fact about this week — sleep, a new class, a cold — before it's a fact about the step. Worth checking before changing the board.
If the board itself gets ignored, it's almost always one of three things: it's in a room where the routine doesn't happen, it has too many cards, or it's being used to ask rather than to show. Move it, trim it to five cards, and for a week try pointing at it instead of narrating it.
Tracking independence over time
A schedule shows the steps of a day; on its own it doesn't tell you whether a step is getting easier over months. That takes a record — memory isn't a reliable place to store six months of Tuesday mornings.
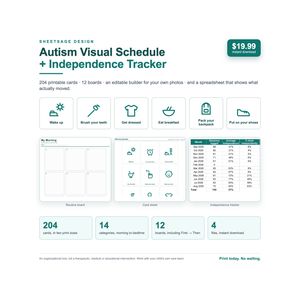
The tracker built into our own kit logs one line per step, per session: date, routine, step, and one of five options for how much help it took — hand-over-hand help, showed how and then they did it, a reminder in words, did it on their own, or skipped today. The first four count as 0%, 33%, 67%, and 100%; "skipped" is recorded but never scored, because a step that didn't happen isn't a step that went badly. Two or three sessions a week is plenty — daily logging is the most common reason tracking sheets get abandoned by week two.
From there the sheet does arithmetic, not interpretation: how often each step was logged, what share was independent, and the first three sessions against the most recent three. A step counts as "improving" only when the last three average at least 15 percentage points higher than the first three — a description of six data points, not a judgment. It stays a record, not an assessment: reading what it means is up to you and whoever else is in the room for that conversation — a teacher, a doctor, a therapist your family works with.
Where our kit fits, if you'd rather not build this yourself
Everything above is the free version — a routine, some cards, a fixed order, a way of watching what changes. If you'd rather start from something already built, our Autism Visual Schedule Builder + Independence Tracker is this setup, finished: 204 cards across fourteen categories in both sizes above, twelve ready-made boards including First → Then, a spreadsheet that runs the independence math automatically, an editable Word file for families who'd rather use their own photographs than drawings, and a 20-page guide with the transition scripts and three-week plan summarized here.
An organizational tool, not a therapeutic, medical or educational intervention. Work with your child's own care team. The kit uses identity-first language ("autistic child"), which most autistic adults report preferring; every word in the editable file can be changed if your family uses different language. Instant download, ready to print the same evening.
This article describes an organizational method and printable materials for use at home. It is not therapy, medical advice, or an educational program, and makes no claim about outcomes for any child. Decisions about supports, schooling, or services belong with your child, you, and the professionals who know your child best.
 Everyone else in these search results sells you the pictures. This kit also tells you what to say — and then shows you which step actually moved.…
See the Autism Visual Schedule Builder + Independence Tracker →